How to Build A 16 foot Geodesic Dome
16 foot Dome IntroductionThe first thing to do is to read Desert Domes then read it again. They have forgotten more about geodesic domes than I will ever know. I built a 2-frequency conduit dome out of 3/4 inch steel conduit, (EMT). Since I didn't to waste material, I choose a 8.3 foot radius dome, using the dome calculator, (which requires javascript to be enabled). Cutting the ConduitAs conduit usually comes in 10 foot lengths, I picked a radius of 8.3 feet, because that gave me pieces of 5.1 and 4.5 feet. (These are center-of-hole to center-of-hole distances). When you add in 1 inch (center-of-hole to end of pipe) at each end (there are 4 ends), and allow .2 inches for cutting, you end up with exactly 10 feet. I allowed a little bit extra room between the hole and the end of the conduit so that the hole wouldn't weaken the conduit. I built the dome at a friends house, and got to use some powertools that I don't have. We cut 2 struts from each 10 foot long piece of conduit. A Milwaukee Super Sawzall was used to cut the conduit, but almost any metal cutting tool could be used. The edges will be sharp, so be careful! |
The next step is to flatten the ends of the conduit, so a bolt can be put through a hole to connect with the other struts. Desertdomes tried a vice and broke it, and used a press. Others have used hammers and an anvil to flatten the ends. I priced presses and found them expensive. I tried hammering an end flat, which took lots of time, effort, and produced an uneven flat end.
I decided to buy a very large vice from Home Depot I think it cost $40, and had 5 inch jaws, and rotated horizontally as well as vertically. I crushed the ends of the conduit easily with the vice, with no obvious damage to the vice. I used a cheater bar which is 1 inch conduit, which I purchased for dome prototyping purposes.
Below is a picture of showing flattening the end of the conduit. You can see the cheater bar used, as well as the vice being rotated so the conduit is parallel to the ground. The vice is clamped to the table, since it is going to be permanently installed elsewhere. Actually, the second end of the end of the conduit is being flattened, which I will talk about later on.
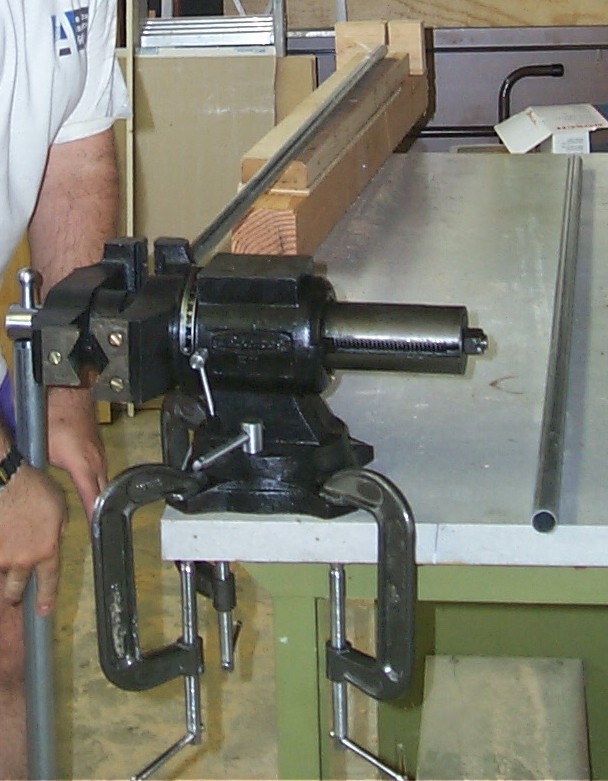
Using the vice I had no problems splitting the EMT along the seam. I tried to align the seam not to be in the middle of the flat, and not to be at the end of the flat, but sometimes I forgot, with no ill effects.
After one end is flattened, the other end needs to be flattened, such that the flat ends are parallel to each other. My friend had a clever idea, and we constructed a jig, which is visible in the above photo. The jig has a vertical slot the width of flattened conduit, that the first flattened end fits into. After flattening all the short struts, the jig is moved to be the right length for the long struts. Since the vice's jaw is vertical, the two flattened ends are guaranteed to be parallel to each other.
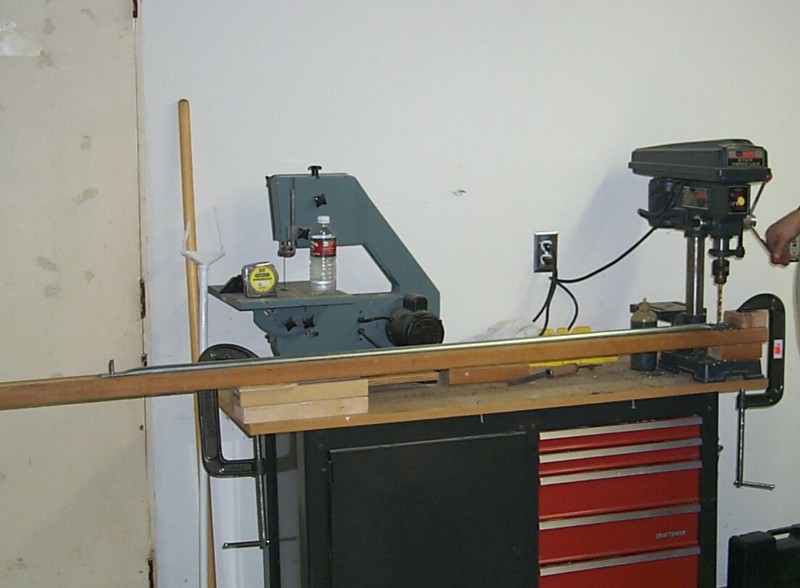
Now a hole must be drilled at each end of the strut. The first hole isn't very critical, but the second hole must be at exactly the correct distance from the first hole. My friend constructed a jig to do it. The jig consists of a 2x4 with a V shaped groove that the conduit rests in so that the flattened ends rest on the surface of the 2x4. If you don't want to cut a V shaped groove, you should add a thin piece of wood where the flattened end is to be drilled, to support the metal. For 3/4 inch conduit, a 3/8 inch piece of wood would be perfect. There is a bolt through the first hole in the jig, and the entire jig is clamped to a table with a drill press at the end of the table. The jig is adjusted so the second hole is at the correct distance. A drill press is very handy to drill nice clean holes. A few spare drill bits of the correct size will also come in handy, as the drill bit will get dull before drilling all the holes. Below is a picture of me drilling a second hole in a strut. You can see the bolt in the jig going through the first hole in the strut. For each different length of conduit, you will have to adjust the length between the hole and the drill. You can either move the bolt, or the jig, take your pick.
Next the conduit must be bent to the correct angle. My friend made another jig. We bent all the ends to about 17 degrees. The steel is somewhat springy and I figured it would align itself as it was assembled. The correct angles are 18 degrees on the A struts and 16 degrees on the B struts.
Finally it was time to assemble the dome. My friend did it from the bottom up. There are 10 bottom struts, and they are all the long ones. Put a bolt through the bottom struts, but don't put a nut on yet. Here is a picture:
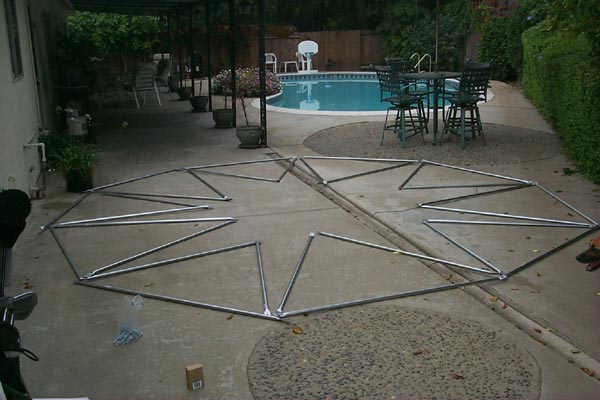
Next install the struts that attach to the bottom struts. Time to put the nut on the bottom bolts. Lift the first layer struts up, two at a time, and put a bolt through the intersection. A ladder or second person comes in handy here to hold the struts upright.
Next, install the horizontal struts at the top of the first layer struts. Use a nut, but don't bother tightening it more than finger tight. Here is how it should look:
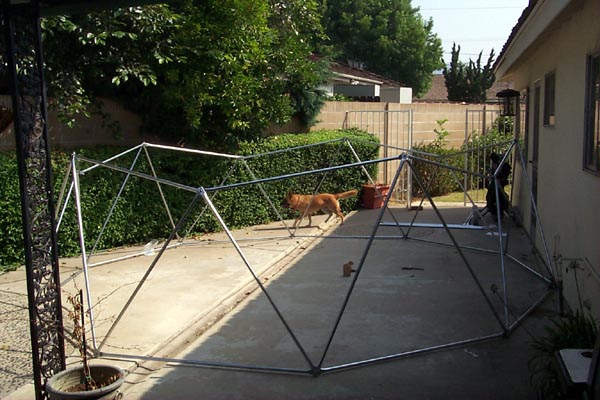
Now install the second layer of struts as well as the horizontal struts at the top of the second layer struts. This can all be done by one person (with a ladder to hold the parts upright). Here is a picture.
Now install the 5 top struts. I had a friend help me with this part.
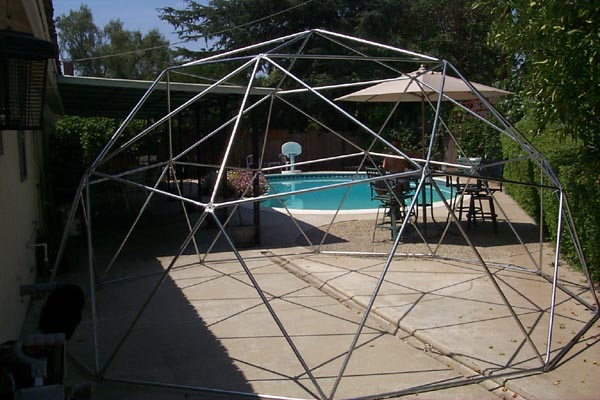
The dome is very strong, as demonstrated below.
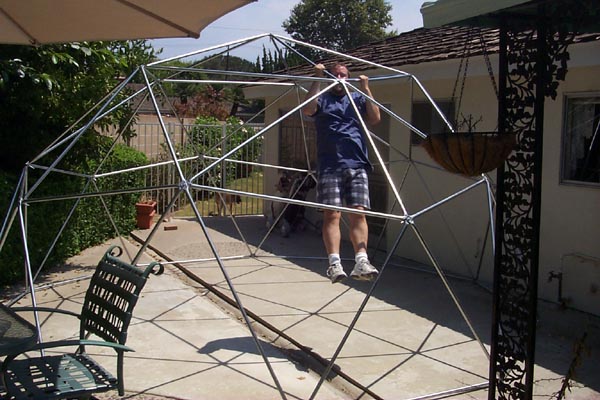
Here is the assembled dome in the desert 2000. It is covered with a rectangular 20 x 30 foot reflective tarp to keep it cool, as it was as hot as 116F during the day. The tarp was also waterproof as well as dustproof, which came in handy for the rain and duststorms.
A 16 foot diameter dome is much bigger than any tent I own. There is room inside for several chairs, coolers, and tons of other stuff. The top is 8 feet high, which means there is plenty of room inside to walk around standing up. Unless you like dancing inside a tent, there should be enough room for a group of 2 to 4 people.
In order to make it easy to assemble the dome, some people paint the 'A' and 'B' poles with spray paint. Then, using a guide, they can assemble the dome. I am sure this works, but I decided to simply mark each pole at the end. I used a piece of colored electrical tape. I went to the store, and bought a pack of 10 colors. I marked each piece on the bottom with one wrap of a specific color at each intersection. There are 10 intersections, so 10 colors worked fine. At the second layer, I used two wraps of tape, next to each other. For the struts that went from the bottom to the next layer, I marked them with one wrap on the bottom, and two wraps on the top. For the third layer, I used three wraps. When I was done, I could take the dome apart, and put it back together just by matching the colored ends to each other. Much easier than other systems I have seen.
For 2000, I used 3/8 inch bolts, 3 inches long. I used 2.5 inch bolts in the desert 2001, as 3 inches is too long. It is likely that 2 inch bolts would work even better. It takes a fair amount of time to turn the nut on the bolt, even when there is little resistance, and shorter bolts minimize that time. On the other hand, you need somewhat long bolts in order to align the poles during assembly. Use two washers per bolt, one against the bolt head, and one against the nut. This is to prevent the head and nut from digging into the conduit.
Tighten down all the bolts after the dome is complete. Once all the struts are attached to a specific bolt, tighten it up a reasonable amount.
It is a good idea to have some kind of weatherproof top vent to let hot air out. Without one, the dome can get pretty hot. I saw some solutions that I didn't like very much. I ended up using a conventional house turbine fan, which costs about $20.
The dome is big enough, but too small to hang a hammock (I ended up on the ground when the hammock was rigged). With great care, a hammock can successfully be hung from the dome, but it isn't trivial. Some wide opening carabeners make nice attachment points inside the dome. Normal carabeners don't open wide enough to go around the EMT.
The easy way to hang a hammock is to buy two pieces of 1 inch tubular webbing, about 4 to 6 feet long. Wrap the webbing around the hub of the dome where you will be securing the hammock. This will distribute the load of the hammock among 5 or 6 poles, which is better than simply using a carabener. You can use thinner webbing, or rope, but it will get very tight, and removing 1/2 or 5/8 inch webbing after people have been in the hammock will be pretty tough. Then tie a loop in the webbing, and attach the hammock. For my hammock chair (in the 24 foot dome), I used two different attaching points, and then joined the webbing together to distribute the load.
There was a 20 foot 2 frequency dome made out of 3/4 inch EMT that seemed plenty strong. There was also a 24 foot 2 frequency dome made out 3/4 inch EMT that was plenty strong. There were 2 hammocks mounted inside the 24 foot dome, and they worked very well.
If you have comments or suggestions, Email me at turbo-www@weasel.com
Created with gnu emacs and template-toolkit, not some sissy HTML editor.
No Java or javascript needed to view my web pages. They
both have significant security issues.